home
  PLANS: top clamp
plans


resources
gallery
faq


The top clamp allows you to clamp down a canvas once it's on the shelf. This keeps it from flopping around or falling forward. The way I did it, the clamp is a bit tricky to make, but not too bad. One could easily substitute multiple pieces instead of cutting out the 'T' shape like I did (as Pat B.--see the gallery).

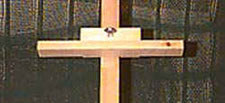
fig. 1: clamp (front)


The clamp is made from two pieces; a 5" 2x4 and a 1' 1x2. The 2x4 has a "T" shape cut out of the back of it (see Fig. 2). The top of the T slides down the center support, and thus is just a bit larger than the 1x2. The skinny part of the T is about 1" wide, just a bit wider than the spacers that sit between the center support and the horizontal braces on the main structure.


fig 2: top clamp diagram (measurements)

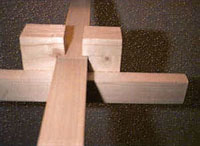
To cut the slot out of the 2x4, I cut a 1 9/16" cut all the way back 1.75". Then, I used a my jigsaw to rough-cut the larger portion and finished it off with a chisel (see Fig. 3). Not easy and takes some to get it to fit, but it works. Then, in the center of the back of the cut, you need to chisel out a square hole *just* big enough for a square 3/8" nut. This nut is what the thumb-screw screws into. It's square so that when you turn the screw it doesn't also turn the nut (the square nut stays firm in its square hole). Finally, drill a 3/8" hole directly into the center front, through to the newly-cut opening.

To finish it off, glue the 1x2 to the bottom of the 2x4 as shown, screw the thumbscrew into place and you're set for the clamp.

Note that it's really best to measure against your exact pieces here, instead of following my directions. Hold the 2x4 up against the center support and draw around it. Do the same with one of the spacers behind the center support (or measure if you can't get to it). My measurements should work for you, but you'll get a better fit if you measure against the actual pieces. This piece works best if it really *just* fits. That way, you can raise the clamp and don't have to tighten the screw just to keep it up for a minute while you raise the shelf, etc.


fig 3: clamp cutout detail (rear)


As an aside, I should say that my first clamp finally broke one day. While wood glue will fix it up just fine, the point at which it broke is in the middle where I had cut out the most wood. For this reason, I highly suggest trying the multiple piece design illustrated so well by Pat B. in her photos in the gallery.


Proceed to the next step: final assembly ...