| PLANS: rear supports |
| plans | ||||||||||||||
|
||||||||||||||
| resources | ||||||||||||||
| gallery | ||||||||||||||
| faq | ||||||||||||||
|
|
The rear supports allow you to tilt the angle of the main support to a comfortable position. By loosening the two wing nuts, you can adjust the angle from 90 degrees (straight up) to 45 degrees back, to even a little forward (i.e. 90+)--good for pastels.. |
|
|
|
The rear supports look
more complicated in the diagrams than they really are. Each support
basically consists of two 2x4's, one slotted and one with a bolt that
slides in the slot. By tightening the wing nut on the bolt, you can
set the adjustment where you want. |
|
|
|
| Cut
two 33 1/2" 2x4's and two 37" 2x4's. 1.5" from the
end of the 33" 2x4's, drill a 3/8" hole in the center.
This hole will hold a 4" long, 3/8" diam. carriage bolt.
The carriage bolt has a square bit under the head so that it digs
into the wood. This enables you to tighten the wing nut w/o having
to hold onto the other end of the bolt. Kind of like embedding the
bolt into the wood. On the other end of each of these pieces, attach
one side of a 3 1/2" wide hinge. This hinge will eventually
get attached to the appropriate brace on the main support. |
|
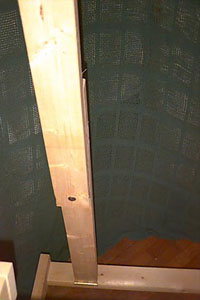 fig. 4: rear support detail (front) |
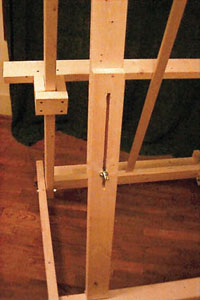 fig. 5: rear support detail (rear) |
|
In the 37" 2x4 you will need to cut a 1' 3" long slot which is 3/8" wide. This is the slot that the carriage bolt will slide through when you adjust the angle. I cut this slot using a jigsaw (also called a scroll saw). First, mark the beginning and end of the slot. Using a 3/8" drill bit, drill a hole at the beginning and end of the slot. This will give you a starting and ending point from which to insert the jigsaw blade. Draw an outline of the slot between each hole so you have a guide and saw out the slot. I found this a bit tough (hadn't used a jigsaw before), but as long as you don't go way outside the lines, you can always fix it up. Once you've drilled out the slot, take a 3/8" bolt and slide it through the length of it to make sure you have sufficient width along the entire length. (Those with routers already know how easy this will be for them). Steve Baird from Australia sent in the great suggestion
of clamping down another board to act as a guide for the jigsaw
to ride against. He says "simply measure the distance between
the blade and the edge of the base on the saw to calculate the position
to clamp the guide. Don't forget to allow for the width of the saw
blade. If the rear support is not wide enough then clamp another
piece of timber next Attach another hinge to
the bottom of this piece, in the same manner you did to the
top piece. Leave the assembly until we've completed a few more steps. |
|